Changelog

Follow up on some of the latest improvements and updates on the Collective Data platform. 

New Inspections Options & Setup

Regular vehicle inspections are essential for ensuring the safety, reliability, and environmental compliance of vehicles on the road. It is also crucial for employees to complete inspections to verify that the tools or assets assigned to them are properly recorded and in good condition. Collective Data allows you to customize and create inspections that fit your needs whether you’re creating one based on your DOT compliance or to have employees verify what inventory items or assets they have assigned to them.

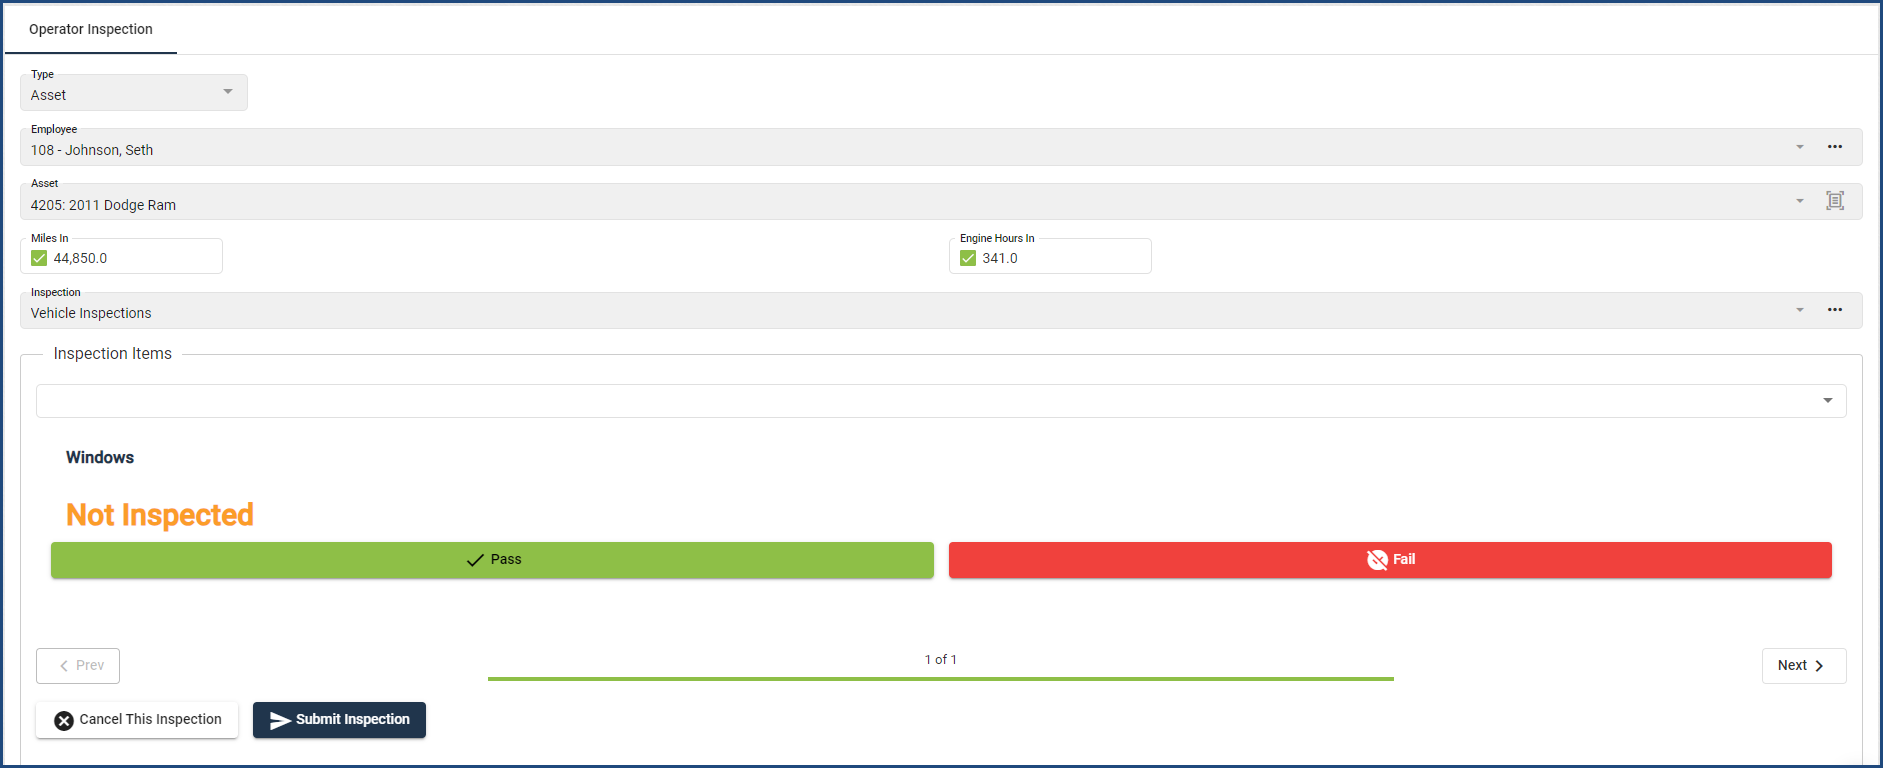
We are excited to introduce several new features and improvements to our inspections! One of the most significant updates is the ability to view inspections in either a List or Step-Through format. The Step-Through option is particularly useful for drivers using a cell phone or tablet for pre- and post-trip inspections, allowing them to simply click Pass or Fail quickly without having to scroll down on the page and potentially lose their spot or forget something.


New Inspections Options & Setup

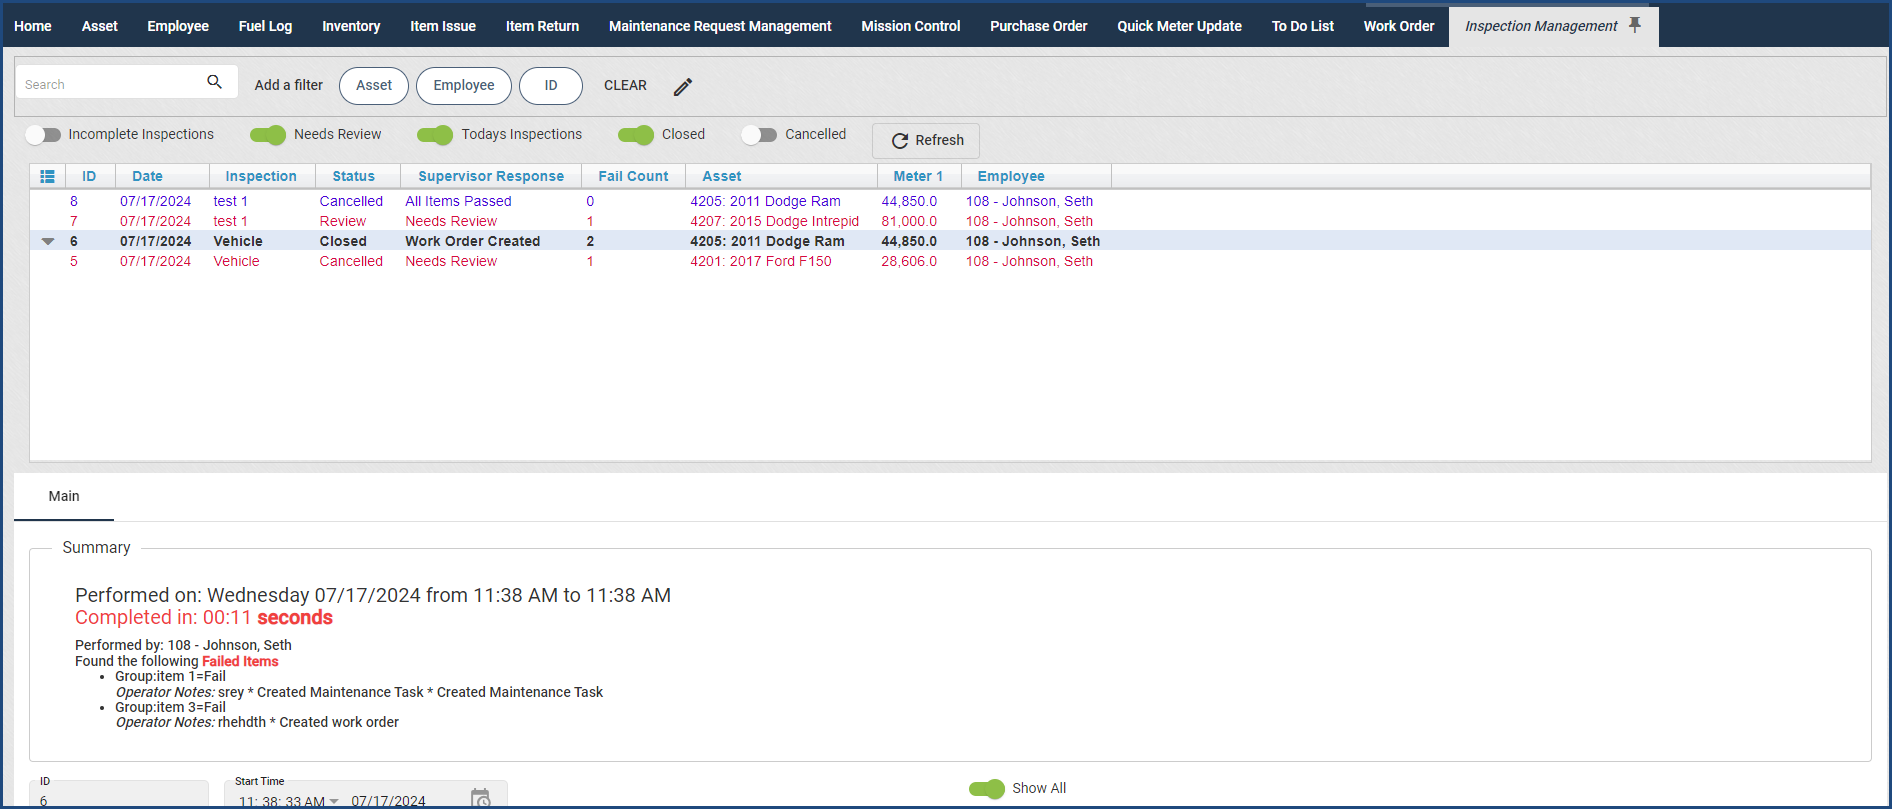
Additionally, we are introducing an Inspection Manager view. Shop or fleet managers can use this view to create work orders or maintenance tasks based on failed inspection items. This view is also useful for sergeants or lieutenants reviewing inspections of weapons or patrol cars.


New Inspections Options & Setup

For detailed instructions on creating and using the new inspections, please refer to the User Guide – Inspections section. If you have any questions, please contact your Client Success Coordinator!

Returning Kits

For Quartermaster clients, improvements were made to the Return Item view to incorporate information when a kit is returned.

When an employee has a kit issued to them and is returning those items, a field will be available to select the kit on the Return Item view. If they do not have any kits issued to them, the field will not be visible.


Kit Return Field Example

Additionally, on the Employee View, a new button appears on the Issued Items tab for their kits. If they have a kit issued to them, a button titled “Return Items from Kit ____” will appear and it will allow for all items in that kit to be returned. If they do not have any kits issued to them, the Kits button will not appear. The original buttons of Return, Transfer, and Go to Issue Record are still available and shown regardless if they have a kit issued or not, so original workflows can still be followed for non-kit items.


Employee View with Return Items Button

Work Orders + Collisions

Fleet clients are now able to use a new Work Type called “Collision.” This will help to determine what Maintenance Costs are associated with normal wear and tear on an asset versus it being involved in an accident.

You can see this broken out on the Life Cycle tab of the Asset View.


Life Cycle Tab with Collision Work Type Example

The Yearly Operating Costs widget on the Asset View and the Asset Operating Costs report now incorporate the collision work code type under “Accident Costs.”

Serializing Inventory at time of Issuance

For Quartermaster clients, we updated the visibility of how to serialize items at the time of Issuance and ensured the serialized fields were unable to be updated on limited user views and on returns.

First, ensure your Inventory item is set up to be serialized. To do this, go to the Inventory record on the Inventory view and check the “Serialize when issued or used” checkbox at the bottom of the screen.


Serialized Inventory Checkbox Example

Issue your inventory item as normal and click Save. After saving, you can go line by line and enter the serial number(s) of the items.


Serial Number Entry Example

We also updated the dropdown to select Specific Item or Category to be buttons now, making it easier to select if the workflow is being done on a tablet or other mobile device.

For more information on this workflow, including seeing the Item Return option, please see the Item Issue → Additional Information section of the software User Guide, located by clicking the Question Mark icon at the top of the application.

Inventory Item Styles Updates

Inventory Item Styles – Barcode Report

For Quartermaster clients who utilize Item Styles for their inventory, the barcode report has now been updated to pull in the individual barcodes from those styles rather than only pulling the barcode from the Main Inventory page.

To print your individual barcodes, you’ll need to enter the information in the Barcode field on the Styles tab.


Styles Tab Barcode Field Example

Select the Inventory Barcodes Report and run the report with any parameters needed.


Inventory Barcodes Report Example

If you do not have individual barcodes for your styles, and still want to print barcodes for scanning your inventory, you can fill in the barcode field on the Main Inventory page or leave it blank to create a barcode using the Item Number.


Main Inventory Barcode Field Example

This has been updated on the Barcodes – Inventory report and on the Barcodes – Received Inventory reports.

Purchase Order Form Update

Quartermaster clients that have Item Styles in their application can now more easily see these item styles on the Purchase Order Form. The form now incorporates the different item styles on a PO. This doesn’t affect any clients that do not use Item Styles – all former functionality is still displayed and used.


Purchase Order Form with Item Styles Example

Shop Module – Technician View Spanish Language Availability

The Technician View for Shop now has Spanish as an option for technicians. To activate, go to the Employee View and locate the Technician. Select Spanish as their Language.


Technician Language Selection Example

You must ensure your employees are data-linked in the application. When the employee logs in, their Technician View will have buttons in Spanish. For example, the Start Work button is now Iniciar Trabajo.


Technician View in Spanish Example

This process is now available in the User Guide.

Inventory Levels Audit

A new tab has been added to the Inventory View → Warehouse Stock tab called “Inventory Levels Audit.”

This tab allows you to track stock levels in relation to the reorder points listed on the Inventory record. You’ll be able to see what date/time an item went at or below your set Reorder Point and what the Reorder Point was at the time of the audit.

How to use:
You must have your Reorder Points and Max Qty on Hand fields filled out on the Inventory record. When an item’s quantity hits or dips below the reorder point, an audit point will appear on that tab that tells you the date/time the item met or went below the reorder point, what the qty was, and what the reorder point is.

Once it hits below the reorder point without being restocked, it will not continue to add records on this tab; it only will take the first time it went below the point. After an additional quantity is added, another point will be added if the item goes below the reorder point again.

*Example:*
Part ABC has a Reorder Point of 5 and a Max Quantity of 10. There are currently 7 in stock.


Inventory Levels Audit Example

  • 4 were used on a Work Order, which brought the available quantity to 3. An audit point will appear on the tab, with a current Qty Available of 3 and Reorder Point of 5.


Audit Point Example 1

  • Another Work Order used 1 of these items, which brings the Quantity on Hand down to 2. There will not be an additional audit listed, because the quantity already hit below the Reorder Point.


Audit Point Example 2

  • A Purchase Order was then received for this part, and the quantity went back up to 10 (the Max Qty).
  • Another Work Order was done and used 7 of this part, which brought the quantity on hand to 3. An Audit point will appear on the tab, because it’s the first time it went below the reorder point after more quantity was added.


Audit Point Example 3

Please see the Inventory section of the software User Guide for more information if needed.

Employee Rank History

We’re thrilled to share that we’ve added new functionality to improve the visibility and transparency of when an officer moves from one rank to another in our Quartermaster solution.
In the Employee View, you will now see a Rank Log button has been added next to the Rank field under the Details section.


Employee View Rank Log Button

This button will display a pop-up showing a historical list of changes to the selected employee’s Rank field.


Rank Log

Additionally, there is now a Rank Log tab that has been added to the Employee View. This tab is intended for Admins to make corrections to an employee’s rank history.


Rank Log tab

Finally, the Employee Rank Log View has been created for Admins to make corrections to all employees’ rank histories. This view also allows users to create a report that displays the number of days at each rank.


Employee Rank Log Report

FedRamp Update and SOC2 Type 1 Report Now Available

Dear Valued Customers,

We are thrilled to share two significant developments in our ongoing commitment to data security and privacy. Your trust in our services drives us to continuously raise the bar and ensure that your information remains safe and secure.

First, we are delighted to announce that we have successfully completed our SOC2 Type 1 Audit. This accomplishment validates our dedication to protecting your confidential information and upholding the highest standards of security. The SOC2 Type 1 Audit involved a rigorous evaluation of our internal controls, policies, and procedures by an independent auditing firm specializing in information security. We are proud to have met all the necessary requirements, reinforcing our commitment to maintaining your trust.

But that’s not all! We are excited to inform you that we are embarking on another important journey: FedRamp Compliance. The Federal Risk and Authorization Management Program (FedRamp) is a rigorous framework that sets the standard for security controls for cloud service providers. By undergoing the FedRamp compliance process, we are taking additional steps to ensure the utmost protection of your data.

The FedRamp compliance process involves a comprehensive evaluation of our systems, processes, and controls by a third-party assessment organization. This process will help us align with the stringent security requirements mandated for federal agencies and further enhance our security posture.

We are committed to providing you with the highest level of transparency and will keep you informed throughout the FedRamp compliance journey. Once we have completed the process and obtained the final authorization, we will proudly announce this achievement. FedRamp compliance reaffirms our commitment to protecting your data, not only for our federal customers but for all of our valued clients.

As always, we welcome your questions and concerns. If you would like to request a copy of our SOC2 Type 1 Audit report or seek further information regarding our FedRamp compliance process, our dedicated customer support team is here to assist you.

We extend our deepest gratitude for your continued support and trust. Your confidence in our services inspires us to go above and beyond in ensuring your data security. Together, we are forging a future where your privacy is paramount.

Thank you for being an invaluable part of our journey. Stay tuned for more exciting updates!

Best regards,
Jesse Farris
COO
Collective Data

March 2026

Our March Release is here! General Updates Work Order Documents We added linkage between the Work Order Documents and Asset Documents. Now, when a Work Order has documents added to it, you can now see those documents in that Asset’s documents tab, and it will be labeled which Work Order they are from.  Inspection Management  We added a date filtering option to the Inspection Management view – now you can filter your inspections to the last 30 or 60 days, or show all. Quick Search field  We changed the Search field at the top of the view to be renamed the Quick Filter field, which is more accurate for…

February 2026

Our February Release is here! General Updates Collapsible Side Navigation for a Larger WorkspaceYou can now collapse the side navigation to create more space in your application workspace! Click the arrows at the top of the navigation panel to collapse it into an icon-only view. Hover over the icons to quickly access the views you need. Click the arrows again to expand the full navigation menu.Work Order – Documents & PicturesThe Documents and Pictures sections on the Work Order view have been moved to tabs at the top of the screen instead of as buttons in the middle. This makes it easier to…

December 2025 Updates

Our December Release is here! For any questions or to schedule an update, please reach out to your Client Success Coordinator by clicking here.  General Updates Auto-Incrementing Inventory Numbers You can now set Inventory to use auto-incrementing numeric inventory numbers for easier and more consistent tracking if you do not have specific numbers you want to use. This works the same as the auto-incrementing asset numbers feature. For information on how to use this feature, check the User Guide under the Inventory topic. Admin – Idle and Absolute Timeouts We added controls on the Admin page to manage idle and absolute…

November 2025 Updates

Our November Release is here! For any questions or to schedule an update, please reach out to your Client Success Coordinator by clicking here.  General Updates Calendar UpdatesWe’re excited to share that Collective Data Calendars have received a fresh new look. The redesigned interface offers a cleaner, more modern experience while keeping all the same functionality you rely on; view upcoming due dates, complete tasks, and navigate directly to related records with ease.The calendars have been added to the left-hand side navigation under their respective topics so you can find them easier.Asset:Asset Registration Calendar (fleet only)PM Schedule CalendarEmployeeLicense/Certifications CalendarOperationsTo-Do CalendarWork Order…